One to Grow On: Lessons Learned in the Garden this Year

Oh boy, it’s been a busy week! With Halloween and my parents coming to visit, and some Christmas shopping accomplished, I had a full weekend!  The weather was less than desirable, we ended up getting some snow on Saturday! Last weekend was absolutely beautiful, and I was ready to accomplish the second phase of my fall preparation for my garden, but I guess that was not meant to be. I pulled muscles in my lower back yet again, and I was sidelined for the whole weekend. So, in between snowflakes that are forecasted for next weekend, I need to start cleaning up the gardens! I figured while I have some down time allowing my back to rest and heal, I thought this would be the perfect time to reflect on this past growing season and evaluate what I did well with what I did not do so well.

Overview:

This was actually a very hard growing season for Western New York. We came off an unusually cold Winter that included two blizzards that shut down the city of Buffalo. We were in the single digits for most of the Winter; no thaw came at all! And because of this brutal cold, the ground stayed cold right into June. Unfortunately, I lost a few plants due to the Winter, and I had a really hard time growing anything I had planted. In fact, most of my plants didn’t really start “growing” until August and bloomed right into September!

Pros:

– The new bed I had my husband roto-till in early spring was just the right size for my yard and my lifestyle. As the old saying goes, “don’t bite off more than you can chew”. I was a little nervous that I might have gone in over my head,that I wouldn’t be able to maintain it. It actually turned out to be just right.

My brand new flower bed--it has changed so much since this picture!

My brand new flower bed–it has changed so much since this picture!

– I added MANY new plants this year. It was pretty much an addiction. I kept buying plants right up until August when all the spring nursery stock was marked down 50%! Spring nursery stock is just a term used to describe plants, shrubs, trees and flowers available for the new growing season.

– This was the first year I was able to enjoy my garden. After six years of planting, transplanting and expanding, my back yard is finally looking like the beautiful, lush, oasis I wanted it to. I bought a few Adirondack chairs and would sit out in the backyard early in the morning listening to the birds and drinking a cup of coffee, all before my daughter woke up. It was the best feeling in the world.

20140908_184940

Cons:

– I did not water enough. Water, Water, WATER. Even though, I must say that I was a lot better this year with watering all of my new plants, I could have done better. Plants you purchase and put into the ground need a ton of water to establish, or as I like to say, “make themselves at home”. Then, once they are established, you don’t have to water as much.

– I need to mulch a little more than I did. This would have helped out with my water situation! It’s amazing how much of a difference mulch does make for beds, such as the ones I have in the far back of my yard, when you can’t get the hose to reach out that far! I have also been interested in making a compost pile.

– I didn’t fertilize as much as I should. I usually fertilize with the Miracle-Gro liquifeed for maybe the first 4-6 weeks of the season. I probably only did it two times this year. I think this would have aided in earlier blooms in my garden.

All in all, progress was made this year, I am happy with that. I have big plans for next year, so that makes me all the more anxious to get out there and get “growing”!

Harvesting the Sun

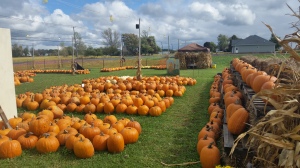
For the most part, this past week was absolutely beautiful. This weekend, not so much. As I type this, I am looking at the lake effect rain (yea, we get that too) from my dining room window that is pouring down in 50 degree weather, shivering as I sip my tea. I shudder to think that right around the corner, snow will be falling. I did manage to get some outdoor things done yesterday in between the rain, like taking my daughter to get her pumpkin from a local pumpkin farm.

20141004_121038    20141004_122421

But, for the most part, I was cooped up inside getting indoor things done, like laundry, which included washing two of my down coats. I am preparing myself for the weather to come within the next few weeks. Mother Nature, please give us a least two more weekends of good weather so we can get out on our little fishing boat a few more times!

With that being said, yes, after a rather fabulous September in Buffalo, October has started out not so good. Cold and dreary. Cold rain is the worst. Even though it was cold, I had a project literally fall for me that would keep me feeling happy and sunny through the cold and drizzle.

On Friday, as I got home from work, I noticed that a few of my sunflowers I had grown this year, had collapsed under the weight of their heads and fallen to the ground.

20141004_102853

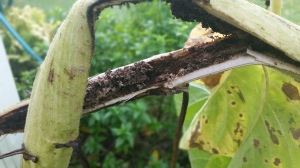
Upon closer inspection, I understood why they did. The inside of their stems rotted out.

20141004_103150

So, instead of waiting a little longer to let them dry out on their own, I had an opportunity to learn how to harvest the ones that fell, not being on the stem.

Let’s start from the beginning. Sunflowers are one of the easiest flowers to grow. I purchased a packet of Mammoth Sunflower seeds for under $2.00 last Winter, to get a jump-start on the season. Sunflowers happen to be a favorite of my husband, so I figured they would be perfect for the side of the garage that was not used up yet, and has nothing but full-on sunshine. So, I had my husband use our tiller to till up the dirt on the empty side of the garage. Mammoth Sunflowers happen to be annuals, but there are many different kinds of sunflowers that are perennials as well. They come in all shapes and sizes. But something about the size of the heads on the Mammoths intrigued me to give them a try. And, it was worth it:

After many garden fails, the sunflowers definitely made up for other disappointment.

After many garden fails, the sunflowers definitely made up for other disappointment.

Fast forward to this past Friday, and my sweet little sunflower patch was finally showing the season was wearing on it.

20141004_103041

So, my next step was to take a nice pair of garden clippers and cut the sunflower heads off, leaving 12 inches of the stem. While it was very cold and rainy, the sun did manage to come out and shine down on my lovely, half-dried sunflower heads.

20141004_104323

I wanted to remove the roots from my little patch after I cut down the sunflowers so I could be free of any “root rubbish” before the next growing season. Knowing that all of these sunflowers were at least 10 feet tall ( I had one that was 15 feet!), it was not going to be easy to get to the root of this stem. No hand cultivator would do, so I had to get out another one of my most coveted garden tools, the garden fork. The garden fork has four “tines” that help aerate and turn up the earth. I find this works the best when you are transplanting or digging up big, massive plants that have complex root systems.

20141004_103339

It did not surprise me at all to see that these mammoth sunflowers had mammoth root systems.

20141004_103831

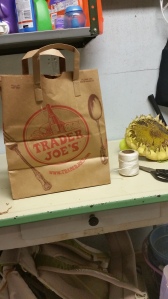
So, after I cut them down, I took them inside to my basement where I went to work on drying them out. Using my great grandmother’s antique enamel top table as a work space, I started the process of drying these great beauties.

20141005_144431

The heads on these babies are so big, I am using paper grocery bags to cover them up. Paper bags are used to catch the seeds as they fall out when they are completely dry, and also to allow the flower head to breath during the drying process. You will also need some string and a pair of scissors.

20141005_145405                  20141005_144801

Place the sunflower in the paper bag, with the stem sticking out.

20141005_144702

Take a good length of string, and place it around the base of the sunflower and grocery bag.

20141005_144752

You can then hang it up anywhere that you have a space to in your basement, or any other part of your house, and let it dry out thoroughly. You will know when it is dried out when the sunflower head is completely brown, and the seeds are falling out on their own. This should take a few days or longer, depending on how far along the sunflower was in the drying process on the stem when the heads were cut. The natural drying process on the stem begins when they start drooping over and the backside of the head begins turning a deep yellow.

Once you have harvested the seeds, you can save them to plant next year, give as gifts, bake them to have as a healthy treat, or just let the birds have the seeds– birds LOVE sunflower seeds. They happen to be highly nutritious for them as well!

Sunflowers are a great plant to consider in your garden. The seeds are inexpensive and they are extremely low maintenance. Sunflowers make people happy, and are a wonderful addition to your landscaping. Just when you thought summer was over, you can still have a little piece of it when you take the time to harvest these fantastic flowers!