Forward to Spring — The Winter Clean-Up

Happy Spring, Everyone!

What a wild and crazy winter we had here in the Northeast! As someone who lives in between two great lakes and is used to some challenging weather, I can’t remember a more windy, bizarre winter. With winds up to 75 mph, it definitely was a “hunker down and stay warm” kind of winter. This left me longing for spring faster than usual. Fortunately, my daughter kept me busy, and we have some other exciting things in the mix this year, which will allow me to flex my gardening muscle and challenge me in a different way. Stay tuned for more information!

The Doldrums of Winter

While winter kind of let me down this year, (January was OK, but February and after was blizzard central), I got to do something I haven’t really done since my daughter was born– read!

Amazon prime kept me busy– I pretty much bought books all season long!

They were all great reads, and I think I will be posting my other favorite reads in a future post. However, I am recommending this one first, because, it was the first one I purchased and the first one I loved!

20190327_093232.jpg

The Atlas of Poetic Botany by Francis Halle is a WONDERFUL read. Honestly, this book was an Instagram Ad on my feed, and I was intrigued. It tells of the unique plants the botanist has encountered in his many years studying the rainforest. The illustrations are delightful. The words flow, making it an engaging and interesting read. It does not get boring and dry like some other informational/reference books on plants can sometimes get, hence the “Poetic” in the name. If you want to learn about the interesting plants of the tropics, including a “walking tree”, I encourage you to read this. There is another book in this series coming out in May called, “The Atlas of Poetic Zoology”, and I can’t wait to get that one!

Spring Things

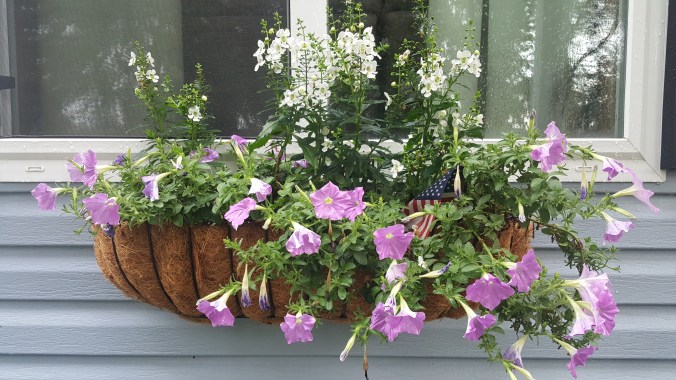
This morning, I was finally able to survey the perimeter of my yard, to see signs of spring that I have been anxiously awaiting. Just the other day, we had snow burying all the little treasures just waiting to pop out and bloom.


From left to right, my alliums, hellebores and tulips are looking good! I guess my leaf mulch helped them get through the sub-zero wind and weather this year! (At least, I’d like to think it did). I am really anxious to get outside and clean up the twigs and other crazy things that blew in and claimed residence to my landscape.

Garden Plans

Yes, it has happened– I have officially become that person who wants to try to grow many varieties of dahlias. I like them because they are just so darn pretty, and they make people happy.  You can take them into work and give them to co-workers who are having a bad day, and they immediately perk up. They bloom well into fall and you can have fresh blooms all the time. I guess that’s why I like them so much. So, I saw one of my fellow gardeners on Instagram have a catalog for Swan Island Dahlias. I quickly requested one myself.

20190327_093525.jpg

So, cut flower gardeners, if you are looking for a good selection of dahlias, this one is for you! Or, if you know of another great collection, please feel free to share! I have purchased a few dahlia bulbs from my local store, so it will be nice to try them from the different places.

I don’t know about you, but I am ready to enjoy spring and get my hands dirty!


Everything is Coming Up Roses — Back in the Garden!

It has been wayyyy to long since I have last blogged! We have had a lot going on in our home– since March, we have been laying down new flooring in phases– which, we finally finished this past weekend! That, and winter being sooo longggg here, it’s been a tough few months, but I got back in the garden this past week, and I have learned quite a bit!

I bought my first Davin Austin® Rose this year! My plans were a little loose as far as the garden was concerned, but one of my major plans was to plant a rose. I splurged and purchased my new “The Pilgrim” rose in February, and they mailed it to me two weeks ago!

Photo source: David Austin Roses

Here’s a little bit of information about The Pilgrim:

  • As you can see above, it is a beautiful yellow climbing rose. Climbing roses to have bigger flowers and don’t grow as fast or vigorously as rambler roses.
  • It does very well in shady areas— particularly North facing areas, which, I was thrilled about, because I planted the rose on the front of my house, which happens to be North facing.

20180501_191416.jpg

I got the rose on the Thursday before we went camping, and, by the way, it was SNOWING and 30 degrees that weekend. I left the bare root in the box. I called David Austin® Roses USA based out of Texas, the Monday after we got back, and wanted to get some info about my rose, and when I should plant it, considering it was snowing the past weekend–why would I bother until it got a little warmer? The customer service representative was a little snarky with me, saying I needed to get the bare root in the ground immediately, but first, I needed to soak it in water for several hours before I planted it. If you follow me on Instagram, you know my desperate call for help when it came to soaking the bare root– several hours, or several days, or just a couple hours? I soaked mine for seven hours and then planted it.

20180501_190902.jpg

My first experience with a bare root anything!! 

Thanks in large part to the David Austin® Roses website, which, I highly recommend visiting, because it is an extremely easy and informative website to understand when it comes to everything roses.

So, what has this rose-growing novice learned so far?

  • Bare root roses need to be soaked for hours (that could be anything from 2 hours to 2 days, everybody has a different preference), so it can be re-hydrated before it is planted in the ground.
  • Make a hole large enough to fit the large root system of the stem. (You could go with the usual rule for any plant, make a hole twice as large as the plant).
  • Give your rose some room to grow– make sure it is not competing too much with other plants. Hmmm…I think my plants might be a little closer than they should be, but hopefully it won’t be a huge issue.

I am happy to report that so far, so good. My bare root has buds on it, and they are growing. I will be giving a full report and time goes on and as I learn more about roses, and what I need to do to keep them alive! I honestly never thought I would ever grow a rose, so the fact I am actually doing it now is very exciting to me.

Stay tuned for more info. I hope you all weathered the long winter well!

Lessons Learned in the Garden – Midsummer Report

Happy summer! It’s hard to believe it’s the end of July– no doubt it’s been a busy one for us. My daughter is at an age where she can do a lot of stuff that she couldn’t before, and we have been taking advantage of it. Life has been busy, and unfortunately blogging has taken a back seat, but I honestly can say that I have been having the time of my life, and as long as I keep getting in a blog post in when I can, I am happy. Family time before all else!

Weather-wise, Western New York has been very rainy and much milder than last summer. I have enjoyed the cooler temps, though, but I have missed going to the beach! Honestly, I have not once had to actually water my plants. No sprinkler posts this year! My window boxes have been thriving, and have not looked sparse and brittle like last year!

wp-1500850365630.jpg

A little wilted after yet more rain, my window boxes are thriving this year! 

Despite the weather, we have busy bike riding, hiking, rollerblading, swimming, camping, all that good summer stuff, but I have been also doing a lot in the garden. I am at the stage where I really am not adding much, but doing more of the routine maintenance on what I do have, and there are certainly some lessons I have learned that I won’t try to intentionally “unlearn” in the future!

Lesson #1– It’s OK to have space between your plants.

I know, I have even mentioned this in past posts, I planted too many things VERY close together (we are talking so close you can smell the body odor on the person next to you close). I was so crazy about trying to get every plant I wanted, I planted them too close together– this resulted in what I like to say “The Survival of the Fittest” in my flower beds– I lost a lot of really cool varieties because I got a tad bit overzealous in my planting. I have spent a good portion of my summer thinning out a lot of my plants, and even moving them if needed…which leads me into the next lesson–

Lesson #2 Plants not blooming/growing that well? It’s OK to MOVE them.

Yes. The biggest thing I have learned in the past few years is if your plants are not doing well in the location you have them– try moving them. They just may need a new residence to make them happy!

A great example of this is my very pretty gayfeather. I purchased these three years ago for 50% off at the local farm store. I put them in an area I had some space, and they grew, but they never actually flowered. I finally had the sense last year to move them to a sunnier location. Ta-da! Full on flower power action!

wp-1500848205595.jpg

This bee is very happy I moved this lovely gayfeather!

Lesson #3 — Remember to do the little stuff.

I can honestly tell you that I don’t have time to weed my whole garden at once. BUT, when I am outside and my daughter is swinging on her swing, I pick an area and go to town! Even if it’s a little area, it makes such a difference! I have managed to keep weeding all summer– little by little, and I feel better about how my landscape looks! I also pruned my Lilac bushes this year, as they were getting a little to “bushy” for me. They were growing right over the area I have my daffodils and muscari, and I want that distinction, if you will, between all of my plants.

If you are follow me on instagram, you will see all the goings-on in my garden. I post pictures of my blooms and my gardening adventures. I will be posting about our little veggie patch, and my mini “cutting” garden. Two new ventures that I would like to expand next year! Until then, take care, and I hope that the summer has been good to you in your neck of the woods!

Got”chia”: The Chia Pet Chronicles

I have been slacking big time on getting posts out in a timely manner. It just hasn’t been happening because Life happens.  Work, kids, family, etc. Lots going on, and that’s not a bad thing! We did finally get some snow this week. I live north of the city, and we never get anywhere near the lake effect snow that the city and south towns get. It really does depress me, because I like to play outside in the snow! Oh well, we are forecasted to get some starting tomorrow, so here’s hoping for a few inches!

My company now allows for flex hours, and I go into work an hour later and leave an hour later. My nights are already pretty compressed — trying to get dinner, play with my daughter  and then start the bedtime routine. But now as my daughter gets older, I feel like my weeknights are flying by faster than ever. So, I have to admit I have been neglecting my indoor plants a little bit. Last year I was learning about my plants and wanting to purchase more, but time seems to be lacking for me to even really get excited about the whole endeavor. I wanted to change that!

I purchased something before Christmas that I never really EVER thought of buying. I mean, I see it on TV all the time around the holidays, but you never really buy the thing, do you?!! Yes, I did.

I bought a Chia Pet. But not just any Chia Pet. The Jurassic World version of the Chia Pet. And of course, it was my daughter who wanted the thing, and of course, I bought it.

20151218_171609

It also didn’t dawn on me that the “chia” in Chia Pet meant the chia seeds I put in my overnight oats were one in the same!

So, I followed the directions, and put the seeds in a quarter cup of water and let them soak for an hour. After the hour, you can start spooning/basting the seeds on the clay form. I tried to spoon them on the top like the picture, but it didn’t work so well for me. (Note: I accidentally threw out the plastic tray that came with the Chia, so I had to use one of my baking dishes.)

20151219_091915

Ok, so obviously mine did not look pretty. Big shocker, it looked nowhere near like what you see on the box. I know this was my first time trying one of these, so I gave myself a break and just let it be.

Now it says to keep watering it everyday by placing water in the hole on top of the clay form. They said to take the left over water in the bottom and put it back in the clay piece, but that did not happen for me. It was pretty much evaporated every day, and I couldn’t get the seeds on top to stay moist.

But, to my surprise, after a few weeks, the bottom half started to sprout, and I was pretty excited about it.

20151225_112331

But then, after a while, even though they did grow well on the bottom half, it started also getting moldy because of the moisture content down there. And on the top like the box shows, NOTHING happened.

What it also says in the instructions is that you can keep using this clay form over and over, but after I finally gave up on the this thing, I tried to wash the seeds off to give it another shot. It was like trying to scrub concrete off something. It didn’t happen.

So, I threw it out. The whole thing. No more Chia Pet. To be honest, I could find many other ways to waste $15 bucks. So, I will just stick to enjoying the holiday commercials.


The Dirt… on Dirt

Pretty much everyone in my neck of the woods became warriors this past weekend. The proof is in the sun-burned faces and foreheads that walked into work this morning! Yes, our first weekend of warm, sunny weather was here, and that meant everyone was ready to dig in to some much-needed yard work!

I myself couldn’t wait to get out there and dig into the earth…well, what I had envisioned as earth, at least — wonderful, nutrient rich soil just waiting for me to sow and plant in it. Instead, I got a rough, dried, break apart and roll out of your hands soil that was begging for water. No matter, I did a little weeding, planted a few cosmos seeds and turned up as much of the “soil” as I could. And, I gave some much-needed water to everything!

DSC_0131

With this whole dried out dirt situation, it got me thinking — What is dirt? How many types are out there? What kind of dirt do YOU have in your neighborhood (that doesn’t have anything to do with your neighbor…)

What is SOIL?

  • Soil is a mixture of minerals, decomposed plants, and rocks. It encompasses everything from Mulch to Chalk. Depending on where in the world you live, you will most likely have soil that has more of one mineral(s) than another. You might get lucky and get the perfect ratio of all the above, which is called Loam. Loam is the ideal growing medium for all plants. Gardeners work really hard to get their soil to loamy proportions. Playing with the pH of your soil helps achieve this.
    • Clay– is made up of the smallest particles found in the earth. This makes it the heaviest and most dense of all soil. The best way to work with this type of soil is knowing when is the best time to do so. The best time to plant in clay soil is when the soil is dry. Its way too hard to work with when it is wet. (Remember grade school?)
    • Silt — has a chalky feel, but is definitely easier to work with than clay. Because silt has mineral particles that are so fine, you can compact it easy and it holds water in. It’s a good mix between sand and clay. The downside is that because it holds water so well, it could hurt your plants by not getting enough air to the roots to dry them enough to grow.
    • Sand — sand is made up of large mineral and rock particles. While it’s not the most desirable soil to plant in, all is not lost if this is the type of soil in your neighborhood. Cactus and other plants that survive drought-like conditions thrive in sand. You can add mulch to your soil if its sandy to keep moisture in, since sand does not hold water well.

Every type of soil I have described above can be enhanced to be the ideal growing medium by adding compost or mulch to help with the growth of your plants. The first step to success in gardening is finding out what type of soil you have around your house. After that, you do what you have to do get the best “dirt” in your neighborhood! You know what I mean…